You’re ready to leave your carrier—what would make the switch a regret?
You usually decide to switch after one too many dropped calls, slow data at the worst time, or a bill that keeps creeping up. The regret shows up later, when the new carrier fixes the problem you noticed—but breaks the parts of your routine you took for granted.
The biggest traps are predictable: your phone loses access to a key 5G band, your office or gym turns into a dead zone, or “unlimited” slows down when the network is busy. The other trap is the bill: promo credits don’t apply the way you assumed, taxes and fees push the total higher, or a trade‑in deal locks you into terms you didn’t plan around.
The goal isn’t to find the “best” network on paper. It’s to confirm your phone, your places, and your real monthly total will all behave the way you expect.
Before you compare coverage, confirm your phone will behave on both networks
“Behave the way you expect” starts with your specific phone model, not the carrier’s map. The same iPhone or Android can support different 5G bands depending on the exact model number, where it was sold, and whether it’s carrier-branded. If your phone can’t use a key band in your area, you’ll feel it as slower data indoors or fewer strong-signal spots, even if the carrier looks great on paper.
Do three checks before comparing coverage: (1) Confirm the phone is unlocked (Settings on iPhone; your account/device status on Android, or the carrier unlock page). (2) Look up your exact model number and make sure it supports U.S. 5G plus LTE, including the newer mid-band 5G bands. (3) Verify it supports eSIM if you want a low-risk trial. The friction: older or imported models can “work” but fall back to slower bands, which is hard to diagnose after you’ve already switched.
Where do you actually need signal this month? Build your ‘real-life map’
That “hard to diagnose after you’ve already switched” feeling usually comes from testing coverage in the wrong places. Most people check their home address, maybe their workplace, then assume the rest will average out. It won’t. One bad building, parking garage, or commute corridor can dominate your day-to-day experience even if everything else is fine.
Build a simple “real-life map” for the next 30 days: list your top 8–12 locations where you actually need reliable service (home room where you sit, office floor, kid’s school pickup line, gym, grocery store, the road you commute on, a friend’s house you visit weekly). Add two time windows that matter—like 8–10 a.m. and 5–8 p.m.—because congestion shows up at predictable times.
Fifteen minutes of list-making now prevents you from over-weighting a single impressive speed test and under-weighting the one place you can’t afford to lose signal.
What the coverage maps won’t show: congestion, 5G bands, and indoor gaps

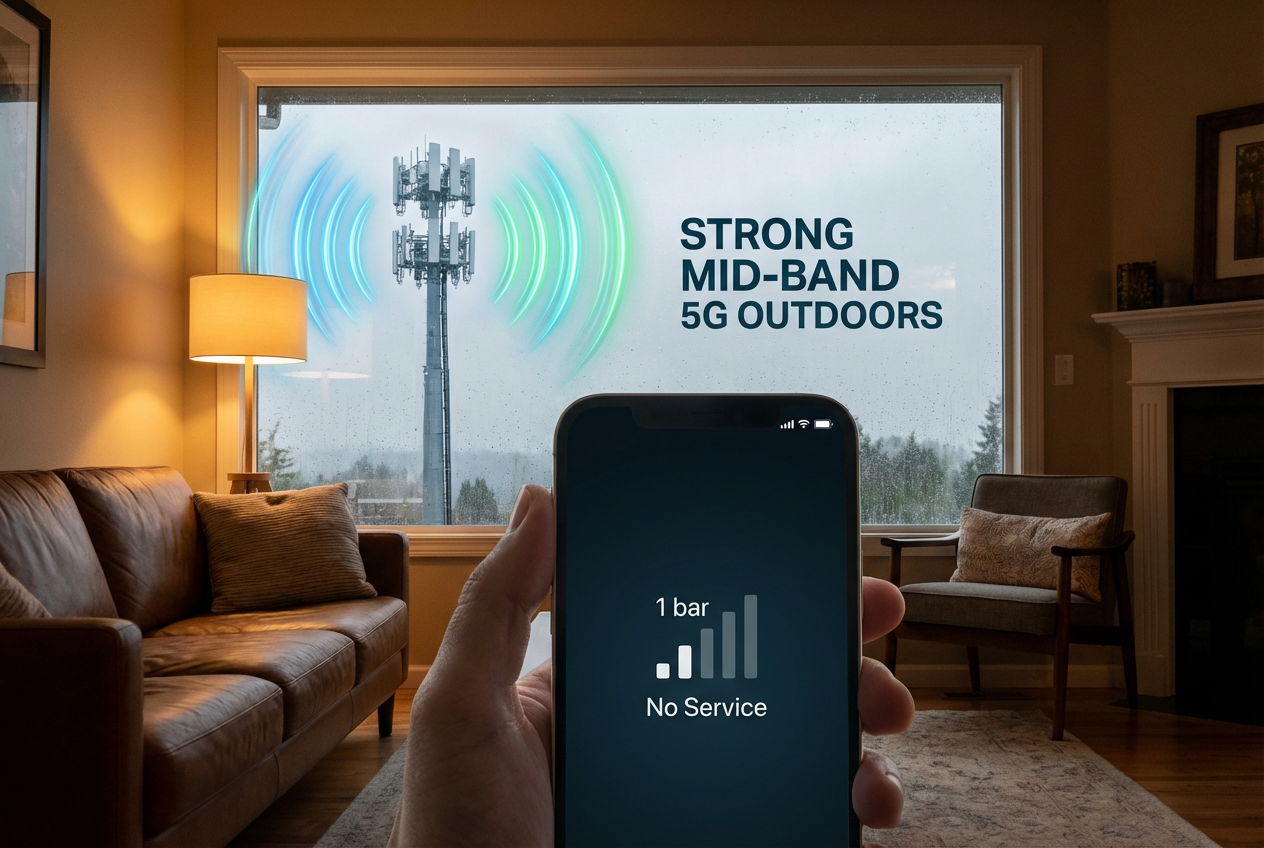
That certainty gets harder because the carrier coverage map mostly answers one question: “Can I get a signal here?” It doesn’t answer the questions that make people regret a switch: “Will it stay fast at 5:30 p.m.?” and “Will it work inside my building?” Two carriers can both show “5G” at your address, but one can bog down during school pickup or at a crowded grocery store because the nearest site is overloaded.
Bands matter here. Mid-band 5G (the “sweet spot”) often delivers the best mix of speed and range, but only if your phone supports the band your area uses and you’re close enough to pick it up. Low-band can reach farther, yet it can feel like LTE indoors when the network is busy.
Indoor gaps are their own problem: concrete, metal, and tinted glass can erase a strong outdoor signal. That’s why you don’t guess—you run a trial in your real-life map.
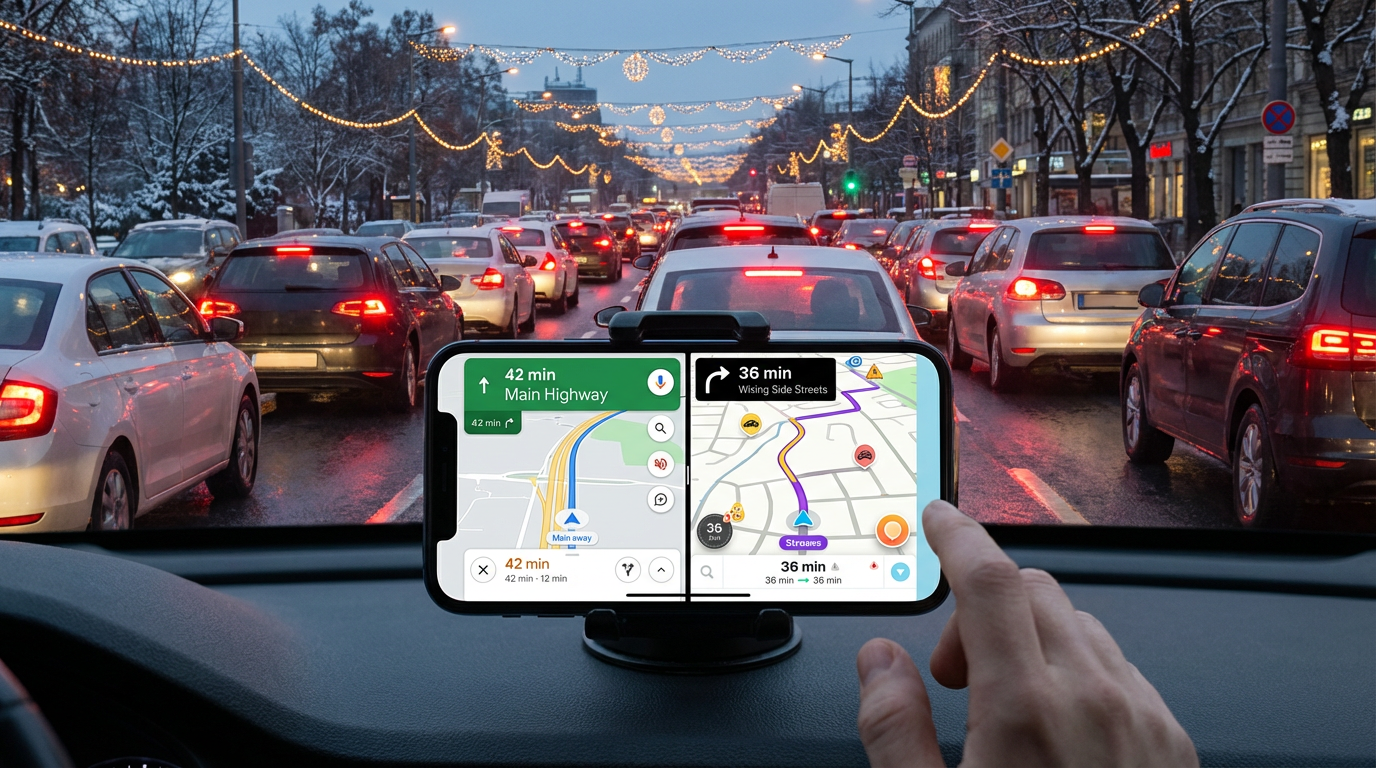
Trial run: how to test AT&T vs. T‑Mobile in your own routine (without committing)
Run the trial the way you’ll actually use the phone: same places, same times, and the same apps. The easiest low-commitment path is eSIM on a second line, so you can keep your current carrier active while you test AT&T and T‑Mobile one at a time. If eSIM isn’t an option, use a short-term prepaid plan. Either way, don’t “tour” coverage—follow your real-life map for 3–7 days.
In each location, do three checks: (1) make a call and walk 30–60 seconds to see if audio breaks, (2) load something you actually use (Maps navigation, a video call, your work chat), and (3) run one speed test during your two busy windows. Note LTE vs. 5G and whether it flips indoors.
The friction is setup and fairness: turn off Wi‑Fi for the same tests, keep the phone in the same pocket/bag, and don’t judge on one “hero” speed result. Once one carrier clears your map reliably, you’re ready to compare the bill details without guessing.
The bill surprise zone: promos, taxes/fees, and trade‑in fine print in 2026
“Compare the bill details” usually starts with a plan price you can recite from an ad, then ends with a first statement that’s $15–$40 higher than you expected. Part of that is routine: taxes and local fees vary by ZIP code, and some plans bundle more of them than others. When you price AT&T vs. T‑Mobile, pull the “estimated monthly total” in checkout (or ask support for your ZIP) and treat that as the real baseline—not the headline rate.
Promos are the second trap because they change the timing of your costs. A “$0” add‑a‑line, BYOD credit, or autopay discount can require a specific plan tier, paperless billing, and a debit/bank autopay method. Miss one condition and the credit disappears, often after you’ve already ported numbers. Screenshot the offer terms and confirm how many months the credit runs.
Trade‑ins add the lock-in. Credits usually apply monthly, so paying off early or changing plans can reduce what you get. If you want flexibility, compare a smaller discount with no long credit schedule, then move on to whether you actually need premium plan perks.
Do you need premium perks—hotspot, international, and data priority—or just dependable basics?
That “premium perks” question usually shows up when the cheaper plan looks fine—until you picture one real week. If you work from your phone even occasionally, check hotspot: some plans throttle hotspot hard or cap it, and a single day of laptop tethering can burn through a small allowance. The trade-off is simple: paying less can mean the first time your home internet drops, your backup plan fails.
International is similar. If you travel even once in the next 60 days, confirm whether your plan includes roaming, a day pass, or requires an add-on, and whether your phone supports eSIM for a local data plan. Don’t assume “Mexico/Canada included” covers every trip.
Data priority is the hidden one. If your trial showed slowdowns at busy times, a higher-tier plan can help; if it didn’t, keep the savings and put that money toward a cleaner switch.
Make the call, then switch safely: a 30‑minute checklist
Once you’ve matched coverage to your real-life map and picked the plan tier, the last risk is a sloppy switch. In 30 minutes, reduce it to a checklist: (1) Screenshot your current plan, any device payment status, and your final bill estimate (with taxes/fees). (2) Generate your port-out PIN and grab your account number, then confirm your line is unlocked. (3) Start new service first (eSIM if possible), then port numbers—don’t cancel the old carrier early.
Two common frictions: trade-in timing and autopay rules. If you’re trading in, photograph the phone, keep tracking, and confirm the return window. If you’re chasing an autopay discount, set it up immediately with the required payment type. After activation, retest two “busy window” spots and check that the first bill matches your estimate before adding lines or extras.