You don’t need “the best” camera app—you need the one that saves your most common shots
You open the App Store, search “best iPhone camera app,” and get a wall of five-star options that all promise “pro controls,” “better HDR,” and “cinematic” everything. Then you install one, toggle a few settings, and still miss the shot you actually care about—your kid blowing out candles, your dog sprinting, a dim restaurant photo that turns into mush.
The win isn’t the app with the longest feature list. It’s the one that reliably fixes your most common failure. That might mean faster focus over manual dials, or cleaner low light even if it looks less “bright.” It might also mean paying a subscription, or needing a tripod to get the headline feature.
Before you compare apps, compare your misses. Your camera roll already tells you what to prioritize.
Think back to your last 20 photos: what went wrong most often?
Your camera roll usually shows a pattern: a handful of photos you kept, and a bunch you meant to keep but didn’t. Pull up your last 20 and tag each “miss” with one simple reason. Not “bad,” but what failed: blur, bad focus, blown highlights, weird color, faces too dark, noise, or the moment already gone.
Then separate capture problems from taste problems. If the issue is motion blur or missed focus, no filter pack will fix it later—you need an app that shoots quickly, nails focus, and picks a shutter speed you can trust. If the issue is that everything looks too bright, too sharp, or too processed, that’s a look problem; you may want different HDR behavior, less sharpening, or a way to lock exposure and white balance.
Be honest about friction. If you won’t use a tripod or adjust dials while people are waiting, rule those apps out now. Once you know your top failure, low light becomes a clear choice, not a vague wish.
Low light: do you want “brighter” or “truer to the moment”?
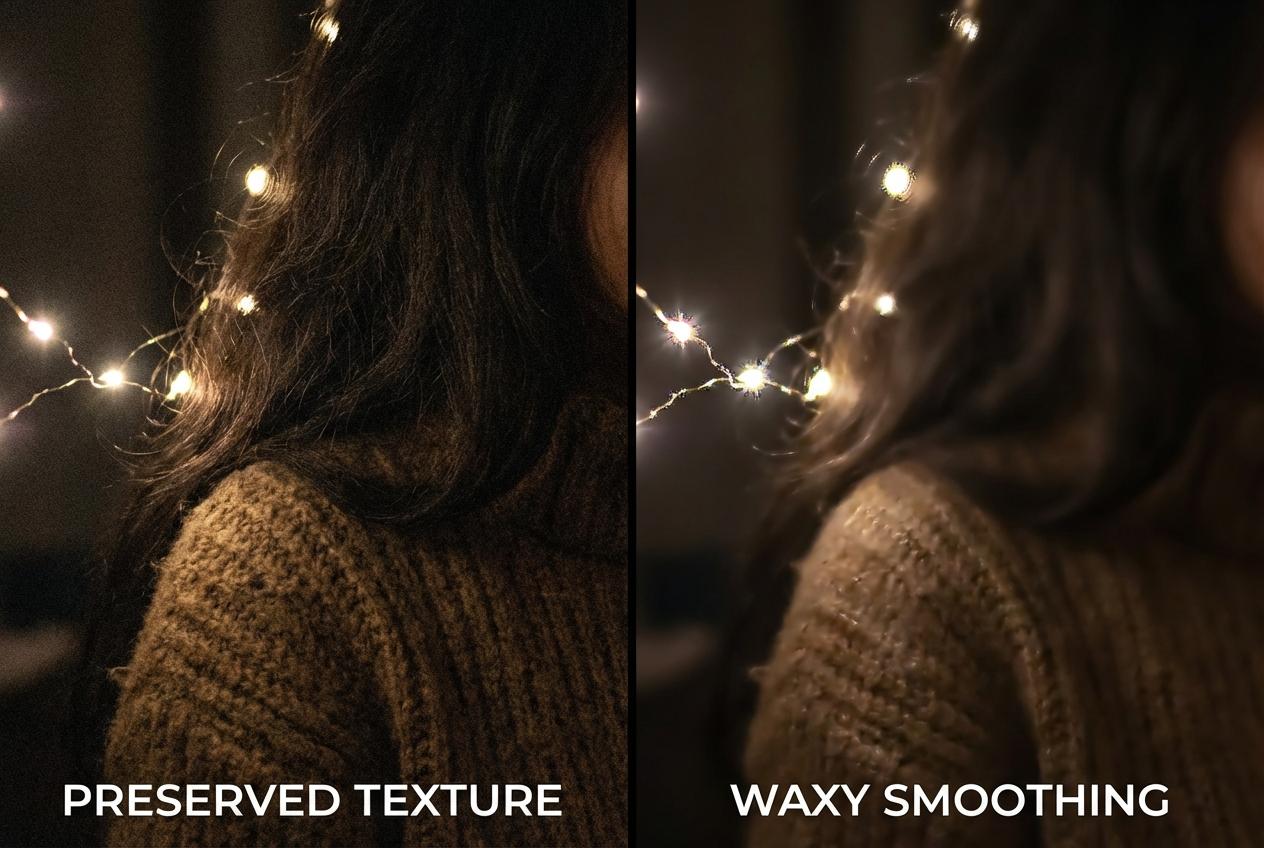
Low light is where your “miss” turns into a real preference. In a dim restaurant or at a birthday party after sunset, most apps can make the photo look brighter—but they don’t all do it the same way, and the trade-offs show up fast.
If you want brighter, you’re usually choosing heavier multi-frame stacking plus stronger noise reduction and sharpening. The upside: faces lift out of shadow and your feed looks clean. The downside: fine texture (hair, fabric, skin) can turn waxy, and moving subjects can get smeared or “double.” If you want truer to the moment, you’re choosing less aggressive processing: darker shadows, more visible grain, but more honest color and fewer weird edges around lights. Apps that let you bias this include Halide (more control over processing and capture) and ProCamera (more manual control when you’ll actually use it).
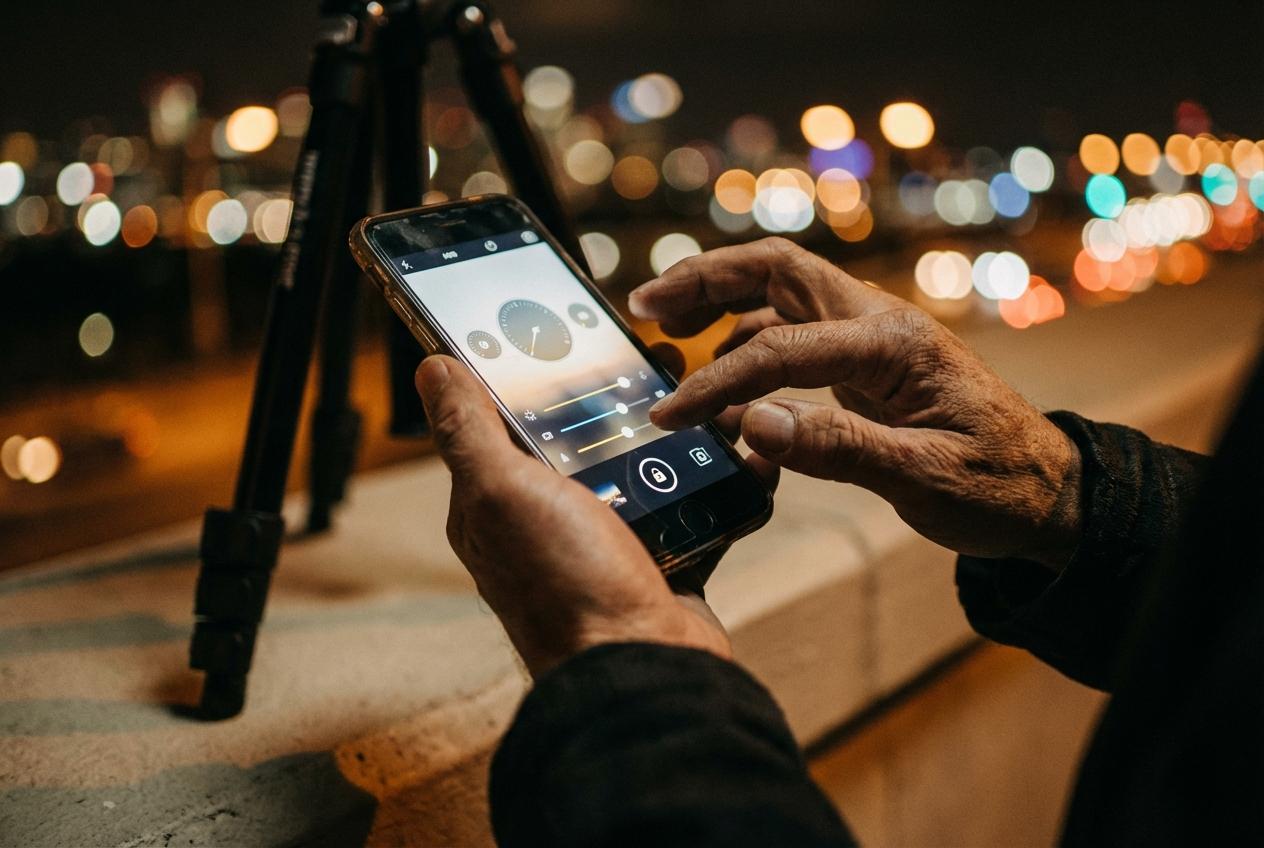
One practical friction: “truer” often means slower shutter or higher ISO, so you’ll need steadier hands—or a tripod for long exposures. If you can’t keep people still, the next question isn’t low light at all—it’s how the app handles motion when kids or pets won’t pause.
When kids/pets won’t pause, what matters more: speed or certainty?
That “won’t pause” moment usually fails in one of two ways: you either don’t get a frame at all, or you get a frame that’s technically sharp but not the right moment. That’s the speed vs. certainty split, and it’s why a “better” camera app can make you miss more shots if it adds steps.
If you want speed, prioritize low shutter lag and simple capture: quick launch, a shutter button that fires instantly, and a reliable burst/rapid-fire option. The trade-off is that you’re often accepting the phone’s default look—more HDR, more sharpening, and less say over shutter speed—because the app is optimizing for getting something sharp right now.
If you want certainty, you’re choosing tools that reduce surprises: tap-to-track focus, exposure lock, and a visible shutter speed so you can force 1/250 (or faster) for movement. The consequence is friction—more misses from fumbling—especially when the “look” matters for what you post next.
If you post a lot, where do you want the ‘look’ to happen: before or after the shot?
That “look” part is where a lot of apps quietly change your hit rate. If you post often, you’ll usually do one of two things: bake the style into the capture so every frame already fits your feed, or shoot as clean as possible and decide the style later when you have a second to think.
If you want the look before the shot, prioritize apps with live previews, reliable filters, and consistent skin tones and skies. This works when you’re posting quickly—coffee, outfits, nights out—because you can judge the vibe while you shoot and avoid “I’ll fix it later” debt. The trade-off is commitment. If that filter crushes shadows or shifts white balance under mixed indoor light, you can’t always undo it, especially if you didn’t capture RAW/ProRAW.
If you want the look after the shot, bias toward clean capture, RAW/ProRAW support on your iPhone model, and stable exposure/white balance locks. You’ll get more room to recover highlights and keep faces natural, but you pay in time—and subscriptions for editors can add up fast. Either way, you’re choosing where you want friction to live: in the moment, or later on the couch.
Three lanes most people fit into (and what you’ll give up in each)
Once you decide where you want friction to live, most people fall into one of three lanes—and the “best” app is just the one whose compromises don’t annoy you.
Lane 1: Snapshot-first (hit rate over control). You keep the stock Camera as default and add something lightweight only when needed (often none). You’ll get fast launch, reliable HDR, and fewer missed moments. You give up predictability: the phone may brighten faces, smooth texture, or over-sharpen, and you can’t always force a faster shutter when motion starts.
Lane 2: Control-first (certainty over speed). Apps like Halide or ProCamera make it easy to lock exposure/white balance, watch shutter speed, and shoot RAW/ProRAW when your model supports it. You give up spontaneity: extra taps and dials can cost frames, and the cleanest gains often need steadier hands—or a tripod for long exposures.
Lane 3: Look-first (consistency over flexibility). Apps like VSCO (or any filter-forward workflow) help you shoot “for your feed” with previews and quick exports. You give up rescue room: heavy styles plus mixed indoor light can bake in color and crushed shadows, and subscriptions can creep into your monthly total—so your final choice should come with a 10-minute setup plan.
Your one-app decision—and the first 10 minutes of settings to lock in
That 10-minute setup plan is what turns “installed” into “used,” because defaults rarely match your lane. Pick one app to trial for a week: Halide if you want cleaner control and RAW/ProRAW options, ProCamera if you’ll actually set shutter speed for motion, VSCO if you want your look while you shoot. Before you commit, check three things: does your iPhone support the RAW/ProRAW mode the app advertises, is it subscription or one-time, and does its headline feature assume a tripod.
Then lock in settings you won’t revisit mid-moment: enable quick launch, set capture to HEIF unless you truly edit (then RAW/ProRAW), turn on a visible shutter speed readout, and add a one-tap AE/AF lock. Finally, run one repeatable test: a dim indoor shot, a moving subject, and a backlit face—then compare to the stock Camera and keep the app that misses less.